linux - fly.io 的基本用法 flyctl launch deploy view ssl domain
访问量: 2928
refer to: https://fly.io/docs/speedrun/
fly.io 是一个类似于heroku, 是一个PAAS平台。 也就是说,目的是为了担任一部分的运维工作。
传统的方式: PUSH 代码 + 虚拟机
fly.io , heroku 的方式: 在开发者的本地使用 命令行, 来上传代码和 启动服务器
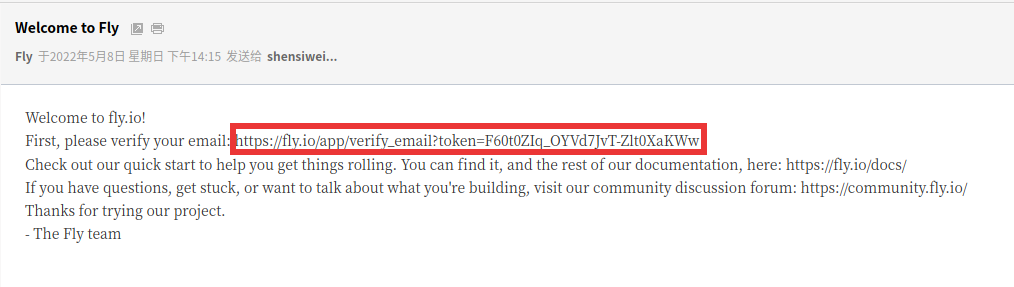
注册和登录: 略。 但是记得要验证邮箱。 否则会报错:Error You must verify your email address to activate your account. https://fly.io/dashboard/parallelid/billing
记得要验证,否则后面无法使用
经验
1. 每次部署Rails大概40~ 分钟起步
2. 部署node项目时间大概是Rails的一半
3. 可以部署Docker
4. 部署的时候不能开启vpn, (因为fly.io的很多东西都是内网IP,或者它自带VPN, 一旦我们自己开启了vpn之后, fly.io就会说找不到192.168.xx IP 就会卡住)
5. app的名字,只能增加,不能修改,而且只能在 [fly.io](http://fly.io) dashboard 中看到。在命令行中通过fly launch这个向导来增加
6. Rails项目需要3个文件: Dockerfile fly.toml config/puma.rb
7. Node项目 需要1个文件: fly.toml
8. 可以通过ssh 来访问,不过每次一退出ssh, 再重新ssh 连接,之前做的任何改动都会消失。(例如上一次ssh 运行的apt-get install procps ,用来提供ps, top命令的,下一次就没了)
安装 flyctl
curl -L https://fly.io/install.sh | sh
  % Total    % Received % Xferd  Average Speed   Time    Time     Time  Current
                                 Dload  Upload   Total   Spent    Left  Speed
100  1415    0  1415    0     0   1185      0 --:--:--  0:00:01 --:--:--  1185
######################################################################## 100.0%
set channel to shell
flyctl was installed successfully to /home/linlin/.fly/bin/flyctl
Manually add the directory to your $HOME/.bash_profile (or similar)
  export FLYCTL_INSTALL="/home/linlin/.fly"
  export PATH="$FLYCTL_INSTALL/bin:$PATH"
Run '/home/linlin/.fly/bin/flyctl --help' to get started
把上面的 export ... 内容, copy 到 ~/.bashrc 目录下, 重进一下terminal 就可以用 flyctl 了。
命令行登录
flyctl auth login
Opening https://fly.io/app/auth/cli/a3293d738c4daab0ded223b52e3e020b ...

Waiting for session... Done
successfully logged in as [email protected]
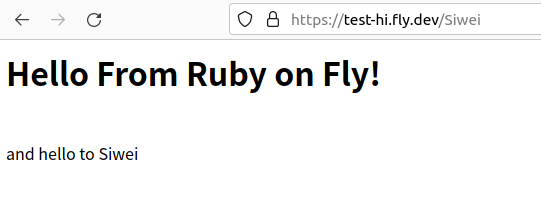
把本地的一个简单的应用,部署到远程
例如一个sinatra 应用。
app.rb
#!/usr/bin/env ruby

require 'rubygems'
require 'bundler/setup'
require 'sinatra'

get '/' do
  "<h1>Hello From Ruby on Fly!</h1>"
end

get '/:name' do
  "<h1>Hello From Ruby on Fly!</h1></br>and hello to #{params[:name]}"
end
Gemfile:
source 'https://rubygems.org'

ruby '3.1.0'
gem 'sinatra'
gem 'puma'
config.ru
require './app.rb'

run Sinatra::Application
本地运行:
$ rackup
Puma starting in single mode...
* Puma version: 5.6.4 (ruby 3.1.0-p0) ("Birdie's Version")
*  Min threads: 0
*  Max threads: 5
*  Environment: development
*          PID: 300873
* Listening on http://127.0.0.1:9292
* Listening on http://[::1]:9292
Use Ctrl-C to stop
在远程运行 flyctl launch (正餐开始了)
Creating app in /workspace/test_fly.io/hello_sinatra
Scanning source code
Detected a Ruby app
Using the following build configuration:
        Builder: heroku/buildpacks:20
? App Name (leave blank to use an auto-generated name): test-hi
? Select organization: parallelid (parallelid)
? Select region: hkg (Hong Kong, Hong Kong)
Created app test-hi in organization parallelid
Wrote config file fly.toml
? Would you like to setup a Postgresql database now? No
? Would you like to deploy now? Yes
Deploying test-hi
==> Validating app configuration
--> Validating app configuration done
Services
TCP 80/443 ⇢ 8080
Remote builder fly-builder-throbbing-dust-8031 ready
==> Building image with Buildpacks
--> docker host: 20.10.12 linux x86_64
20: Pulling from heroku/buildpacks
d5fd17ec1767: Pull complete
。。。还有好多内容
下面是继续来的内容: (大概耗时5分钟吧。)
f3d36f64365e: Pull complete
c40ad6f28bc3: Pull complete
4158046c38fd: Pull complete
ae6ac0afe66e: Pull complete
ecf09e23a9b8: Pull complete
982914e67c01: Pull complete
357fefdf9bc9: Pull complete
f1660bede629: Pull complete
bcbb9964778f: Pull complete
ad5d987158b1: Pull complete
210536913458: Pull complete
5527c4faf53d: Pull complete
87fedb7d6f85: Pull complete
c10fd1b9aa75: Pull complete
b0a4219d827e: Pull complete
09da55ac2274: Pull complete
5e9efba38b67: Pull complete
ad3978c5ff0a: Pull complete
263a9c3bd329: Pull complete
4b4fdc0a5936: Pull complete
7879deff42eb: Pull complete
34fa42dea80c: Pull complete
0ab11be9e73e: Pull complete
2348e050d739: Pull complete
75986aede264: Pull complete
ea4974e3e948: Pull complete
4c37f5287c70: Pull complete
9215aa0839f1: Pull complete
4f4fb700ef54: Pull complete
# 以上都是创建容器
Digest: sha256:2ef9a033b84acffd48ea4a9ac716b0ab47be9cc04b875dd3fa0fd46e8b94e229
Status: Downloaded newer image for heroku/buildpacks:20
20: Pulling from heroku/pack
d5fd17ec1767: Already exists
f3d36f64365e: Already exists
c40ad6f28bc3: Already exists
b86fa585af3b: Pull complete
ca879fc9e9c4: Pull complete
Digest: sha256:637aa6614512b6bdf403d92f38f5bed6f18175ed04f1fdb1f6d33891d846f11a
Status: Downloaded newer image for heroku/pack:20
===> DETECTING
1 of 2 buildpacks participating
heroku/ruby 0.1.3
===> ANALYZING
Previous image with name "registry.fly.io/test-hi:cache" not found
===> RESTORING
===> BUILDING
-----> Installing bundler 2.2.21
-----> Removing BUNDLED WITH version in the Gemfile.lock
-----> Compiling Ruby/Rack
-----> Using Ruby version: ruby-3.1.0
-----> Loading Bundler Cache
-----> Installing dependencies using bundler 2.2.21
       Running: BUNDLE_WITHOUT='development:test' BUNDLE_PATH=/layers/heroku_ruby/gems/vendor/bundle BUNDLE_BIN=vendor/bundle/bin BUNDLE_DEPLOYMENT=1 bundle install -j4
       Fetching gem metadata from https://rubygems.org/....
       Using bundler 2.3.3
       Using ruby2_keywords 0.0.5
       Fetching nio4r 2.5.8
       Fetching rack 2.2.3.1
       Fetching tilt 2.0.10
       Fetching mustermann 1.1.1
       Installing tilt 2.0.10
       Installing mustermann 1.1.1
       Installing rack 2.2.3.1
       Installing nio4r 2.5.8 with native extensions
       Fetching rack-protection 2.2.0
       Installing rack-protection 2.2.0
       Fetching sinatra 2.2.0
       Installing sinatra 2.2.0
       Fetching puma 5.6.4
       Installing puma 5.6.4 with native extensions
       Bundle complete! 2 Gemfile dependencies, 9 gems now installed.
       Gems in the groups 'development' and 'test' were not installed.
       Bundled gems are installed into `/layers/heroku_ruby/gems/vendor/bundle`
       Bundle completed (7.48s)
       Cleaning up the bundler cache.
       Removing bundler (2.2.21)
-----> Detecting rake tasks


===> EXPORTING
Adding layer 'heroku/ruby:env'
Adding layer 'heroku/ruby:gems'
Adding layer 'heroku/ruby:ruby'
Adding 1/1 app layer(s)
Adding layer 'launcher'
Adding layer 'config'
Adding layer 'process-types'
Adding label 'io.buildpacks.lifecycle.metadata'
Adding label 'io.buildpacks.build.metadata'
Adding label 'io.buildpacks.project.metadata'
Setting default process type 'web'
Saving registry.fly.io/test-hi:cache...
*** Images (1b83ddfbeed6):
      registry.fly.io/test-hi:cache
      registry.fly.io/test-hi:deployment-1654140152
Adding cache layer 'heroku/ruby:gems'
--> Building image done
==> Pushing image to fly
The push refers to repository [registry.fly.io/test-hi]
87dc756f0bc5: Pushed
a248e8c4fc0a: Pushed
195ce6778985: Pushed
1a6d637e209e: Pushed
fd941a6af848: Pushed
dcafa52b9be9: Pushed
a1e3b8b5e582: Pushed
0b9d6a2b9aef: Pushed
219a884327cf: Pushed
6c6007ce9a6d: Pushed
c2fb59d1c64c: Pushed
bf8cedc62fb3: Pushed
deployment-1654140152: digest: sha256:be1911e63320f67e076a25e15e88210e222cbac0de6c12b83fc097d90df12c94 size: 2826
--> Pushing image done
Image: registry.fly.io/test-hi:deployment-1654140152
Image size: 657 MB
==> Creating release

Release v2 created

You can detach the terminal anytime without stopping the deployment
Monitoring Deployment

v0 is being deployed

1 desired, 1 placed, 1 healthy, 0 unhealthy [health checks: 1 total, 1 passing]
--> v0 deployed successfully
可以发现,在本地代码文件夹,会多出一个文件: fly.toml
内容如下:
# fly.toml file generated for test-hi on 2022-06-02T11:22:18+08:00

app = "test-hi"

kill_signal = "SIGINT"
kill_timeout = 5
processes = []

[build]
  builder = "heroku/buildpacks:20"

[env]
  PORT = "8080"

[experimental]
  allowed_public_ports = []
  auto_rollback = true

[[services]]
  http_checks = []
  internal_port = 8080
  processes = ["app"]
  protocol = "tcp"
  script_checks = []

  [services.concurrency]
    hard_limit = 25
    soft_limit = 20
    type = "connections"

  [[services.ports]]
    force_https = true
    handlers = ["http"]
    port = 80

  [[services.ports]]
    handlers = ["tls", "http"]
    port = 443

  [[services.tcp_checks]]
    grace_period = "1s"
    interval = "15s"
    restart_limit = 0
    timeout = "2s"
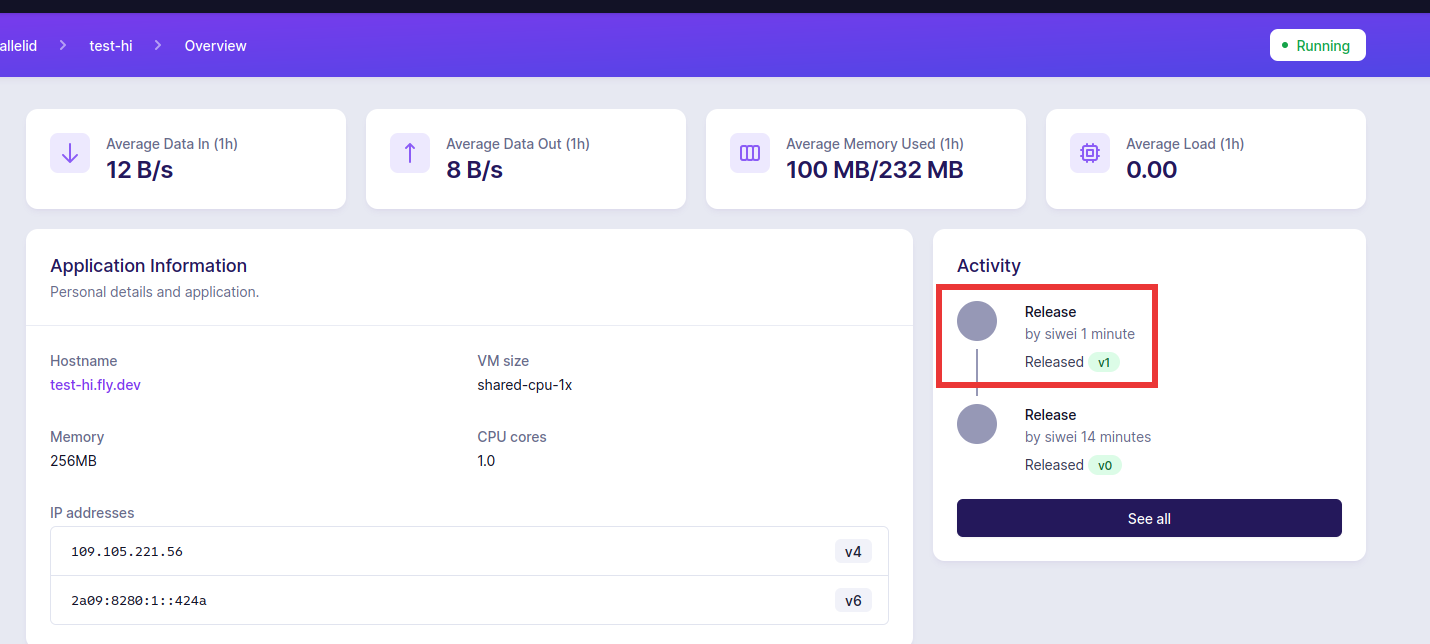
此时,后台就会多出一个app 来。
可以看到他的 cpu 核心数目 等等。
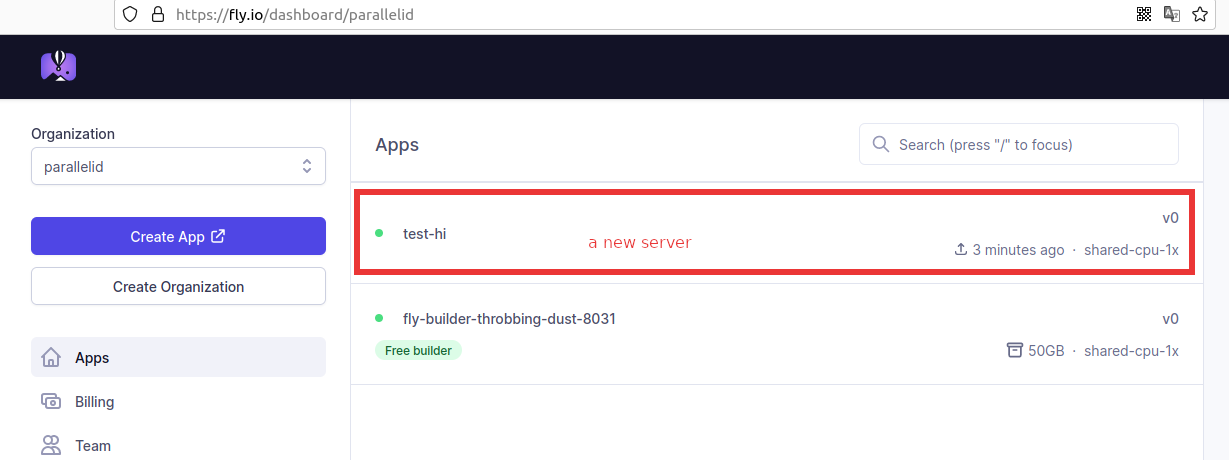
点击上面的红框,就可以看到 该 部署(或者叫虚拟机)的详细情况,如下图所示:

点击上图中的 hostname , (我们发现 fly 自动分配了一个 域名给我们使用 <app-name>.fly.dev )
就可以查看我们刚才弄的 app 了。
(根据官方文档,也可以使用命令行来打开 这个网址)
如何部署 Rails 项目?
如何做部署 flyctl deploy (前提:需要有个 fly.toml 文件)
linlin@linlin-i5:/workspace/test_fly.io/hello_sinatra$ flyctl  deploy
==> Verifying app config
--> Verified app config
==> Building image
WARN Error connecting to local docker daemon: Got permission denied while trying to connect to the Docker daemon socket at unix:///var/run/docker.sock: Get "http://%2Fvar%2Frun%2Fdocker.sock/_ping": dial unix /var/run/docker.sock: connect: permission denied
Remote builder fly-builder-throbbing-dust-8031 ready
==> Building image with Buildpacks
--> docker host: 20.10.12 linux x86_64
20: Pulling from heroku/buildpacks
Digest: sha256:2ef9a033b84acffd48ea4a9ac716b0ab47be9cc04b875dd3fa0fd46e8b94e229
Status: Image is up to date for heroku/buildpacks:20
20: Pulling from heroku/pack
Digest: sha256:637aa6614512b6bdf403d92f38f5bed6f18175ed04f1fdb1f6d33891d846f11a
Status: Image is up to date for heroku/pack:20
===> DETECTING
1 of 2 buildpacks participating
heroku/ruby 0.1.3
===> ANALYZING
Restoring metadata for "heroku/ruby:gems" from app image
Restoring metadata for "heroku/ruby:ruby" from app image
Restoring metadata for "heroku/ruby:env" from app image
===> RESTORING
Restoring data for "heroku/ruby:gems" from cache
===> BUILDING
-----> Installing bundler 2.2.21
-----> Removing BUNDLED WITH version in the Gemfile.lock
-----> Compiling Ruby/Rack
-----> Using Ruby version: ruby-3.1.0
-----> Loading Bundler Cache
-----> Installing dependencies using bundler 2.2.21
       Running: BUNDLE_WITHOUT='development:test' BUNDLE_PATH=/layers/heroku_ruby/gems/vendor/bundle BUNDLE_BIN=vendor/bundle/bin BUNDLE_DEPLOYMENT=1 bundle install -j4
       Using bundler 2.3.3
       Using ruby2_keywords 0.0.5
       Using mustermann 1.1.1
       Using nio4r 2.5.8
       Using puma 5.6.4
       Using rack 2.2.3.1
       Using rack-protection 2.2.0
       Using tilt 2.0.10
       Using sinatra 2.2.0
       Bundle complete! 2 Gemfile dependencies, 9 gems now installed.
       Gems in the groups 'development' and 'test' were not installed.
       Bundled gems are installed into `/layers/heroku_ruby/gems/vendor/bundle`
       Bundle completed (0.30s)
       Cleaning up the bundler cache.
       Removing bundler (2.2.21)
-----> Detecting rake tasks


===> EXPORTING
Reusing layer 'heroku/ruby:env'
Adding layer 'heroku/ruby:gems'
Reusing layer 'heroku/ruby:ruby'
Reusing 1/1 app layer(s)
Reusing layer 'launcher'
Reusing layer 'config'
Reusing layer 'process-types'
Adding label 'io.buildpacks.lifecycle.metadata'
Adding label 'io.buildpacks.build.metadata'
Adding label 'io.buildpacks.project.metadata'
Setting default process type 'web'
Saving registry.fly.io/test-hi:cache...
*** Images (0f36fca80010):
      registry.fly.io/test-hi:cache
      registry.fly.io/test-hi:deployment-1654141089
Adding cache layer 'heroku/ruby:gems'
--> Building image done
==> Pushing image to fly
The push refers to repository [registry.fly.io/test-hi]
87dc756f0bc5: Layer already exists
a248e8c4fc0a: Layer already exists
195ce6778985: Layer already exists
1a6d637e209e: Layer already exists
fd941a6af848: Layer already exists
a0f4f5bc238a: Pushed
a1e3b8b5e582: Layer already exists
0b9d6a2b9aef: Layer already exists
219a884327cf: Layer already exists
6c6007ce9a6d: Layer already exists
c2fb59d1c64c: Layer already exists
bf8cedc62fb3: Layer already exists


deployment-1654141089: digest: sha256:421bfd41aeac1a845f2c04ae5bfe05d6c99cd4d6733f960264d3aa06a4bcad78 size: 2826
--> Pushing image done
image: registry.fly.io/test-hi:deployment-1654141089
image size: 657 MB
==> Creating release
--> release v1 created

--> You can detach the terminal anytime without stopping the deployment
==> Monitoring deployment

 1 desired, 1 placed, 1 healthy, 0 unhealthy [health checks: 1 total, 1 passing]
--> v1 deployed successfully  (注意刚才是 V0 )
现在新的部署,在后台也可以看到了:
其他的命令:
flyctl info 查看节点的信息 耗时10秒
App
  Name     = test-hi
  Owner    = parallelid
  Version  = 0
  Status   = running
  Hostname = test-hi.fly.dev

Services
PROTOCOL PORTS
TCP      80 => 8080 [HTTP]
         443 => 8080 [TLS, HTTP]

IP Adresses
TYPE ADDRESS           REGION CREATED AT
v4   109.105.221.56           10m54s ago
v6   2a09:8280:1::424a        10m53s ago
flyctl status 查看节点状态, 耗时10秒
App
  Name     = test-hi
  Owner    = parallelid
  Version  = 1
  Status   = running
  Hostname = test-hi.fly.dev

Deployment Status
  ID          = 7b5f7fa7-9622-1507-a4e3-251203b7864b
  Version     = v1
  Status      = successful
  Description = Deployment completed successfully
  Instances   = 1 desired, 1 placed, 1 healthy, 0 unhealthy

Instances
ID      	PROCESS	VERSION	REGION	DESIRED	STATUS 	HEALTH CHECKS     	RESTARTS	CREATED
4b85040c	app    	1      	hkg   	run    	running	1 total, 1 passing	0       	3m53s ago
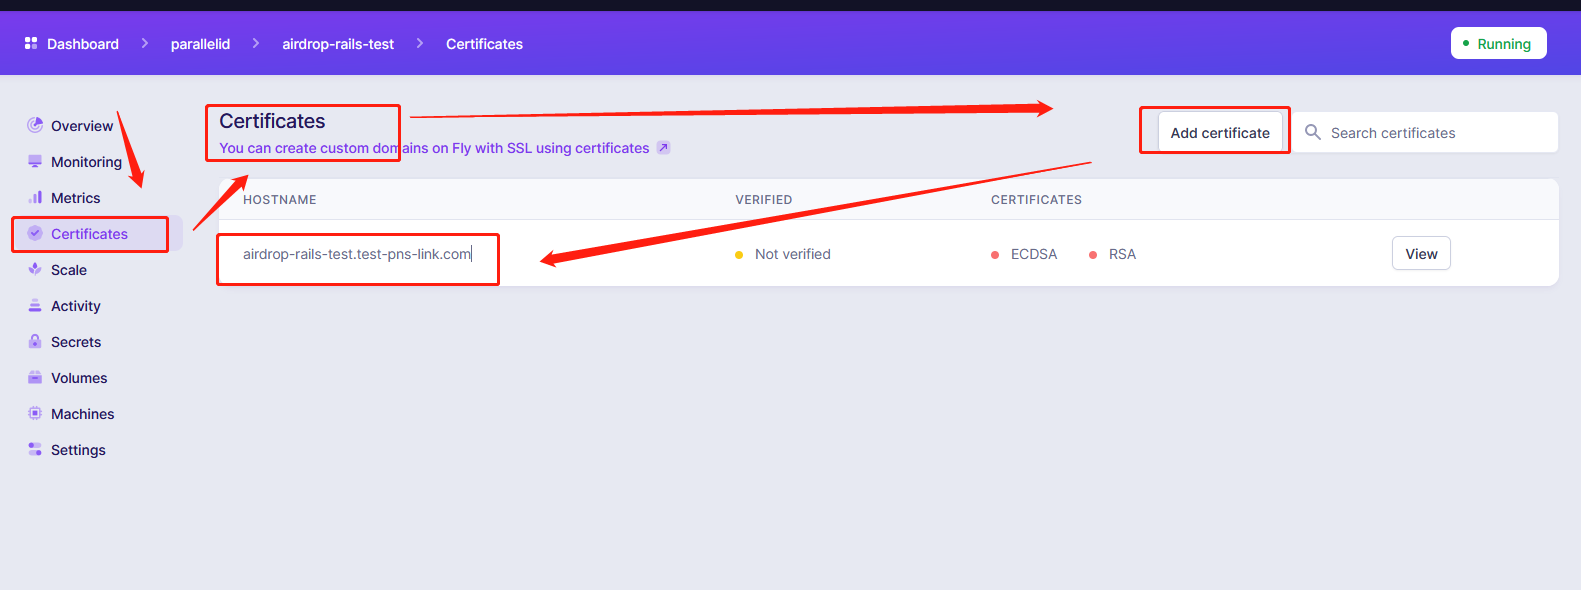
设置ssl 域名
点击左侧的 certificates, 输入咱们的域名, 然后点击View, 根据提示进行配置: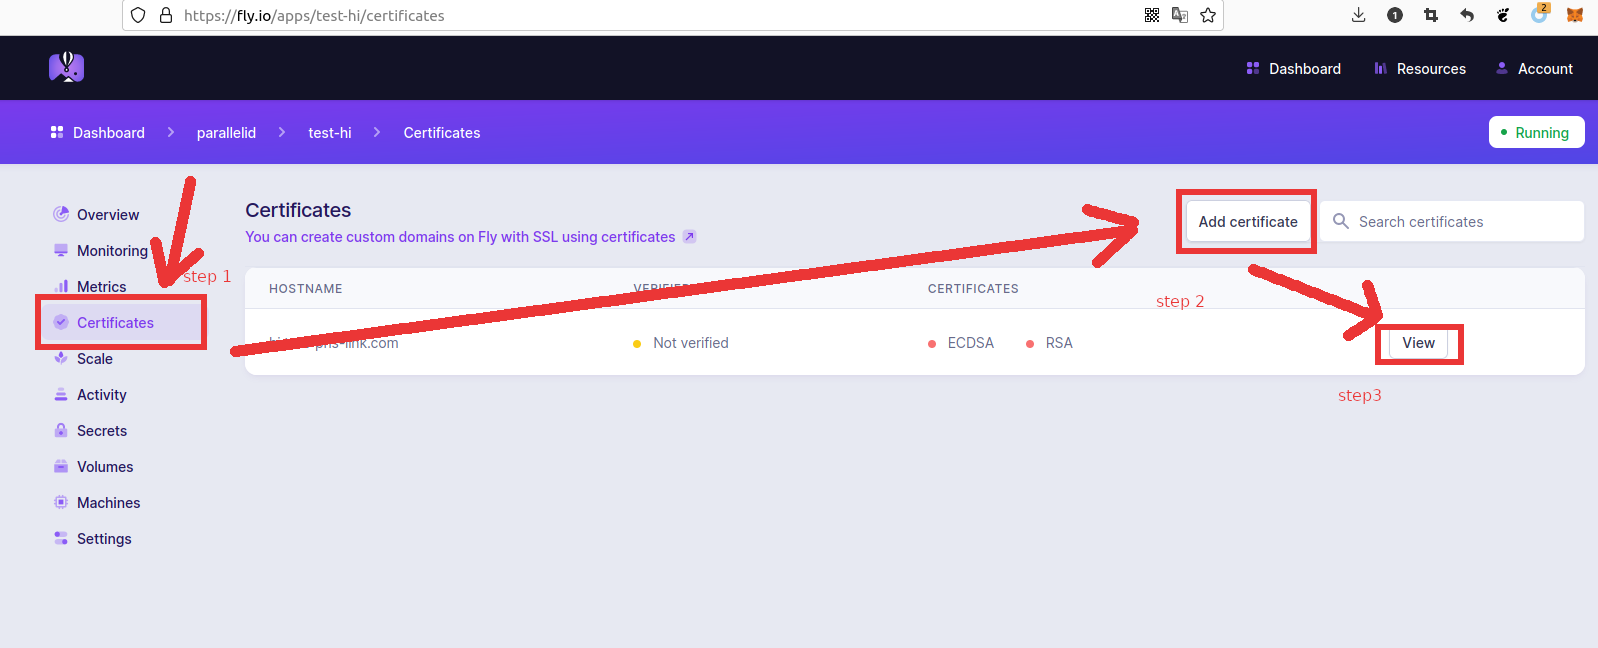
点击后是这样:

deploy 之前: 不要使用 HTTP_PROXY, HTTPS_PROXY 这样的东东
会直接导致无法部署,因为proxy是不会正确识别 fly.io的各种服务器和IPV6地址的
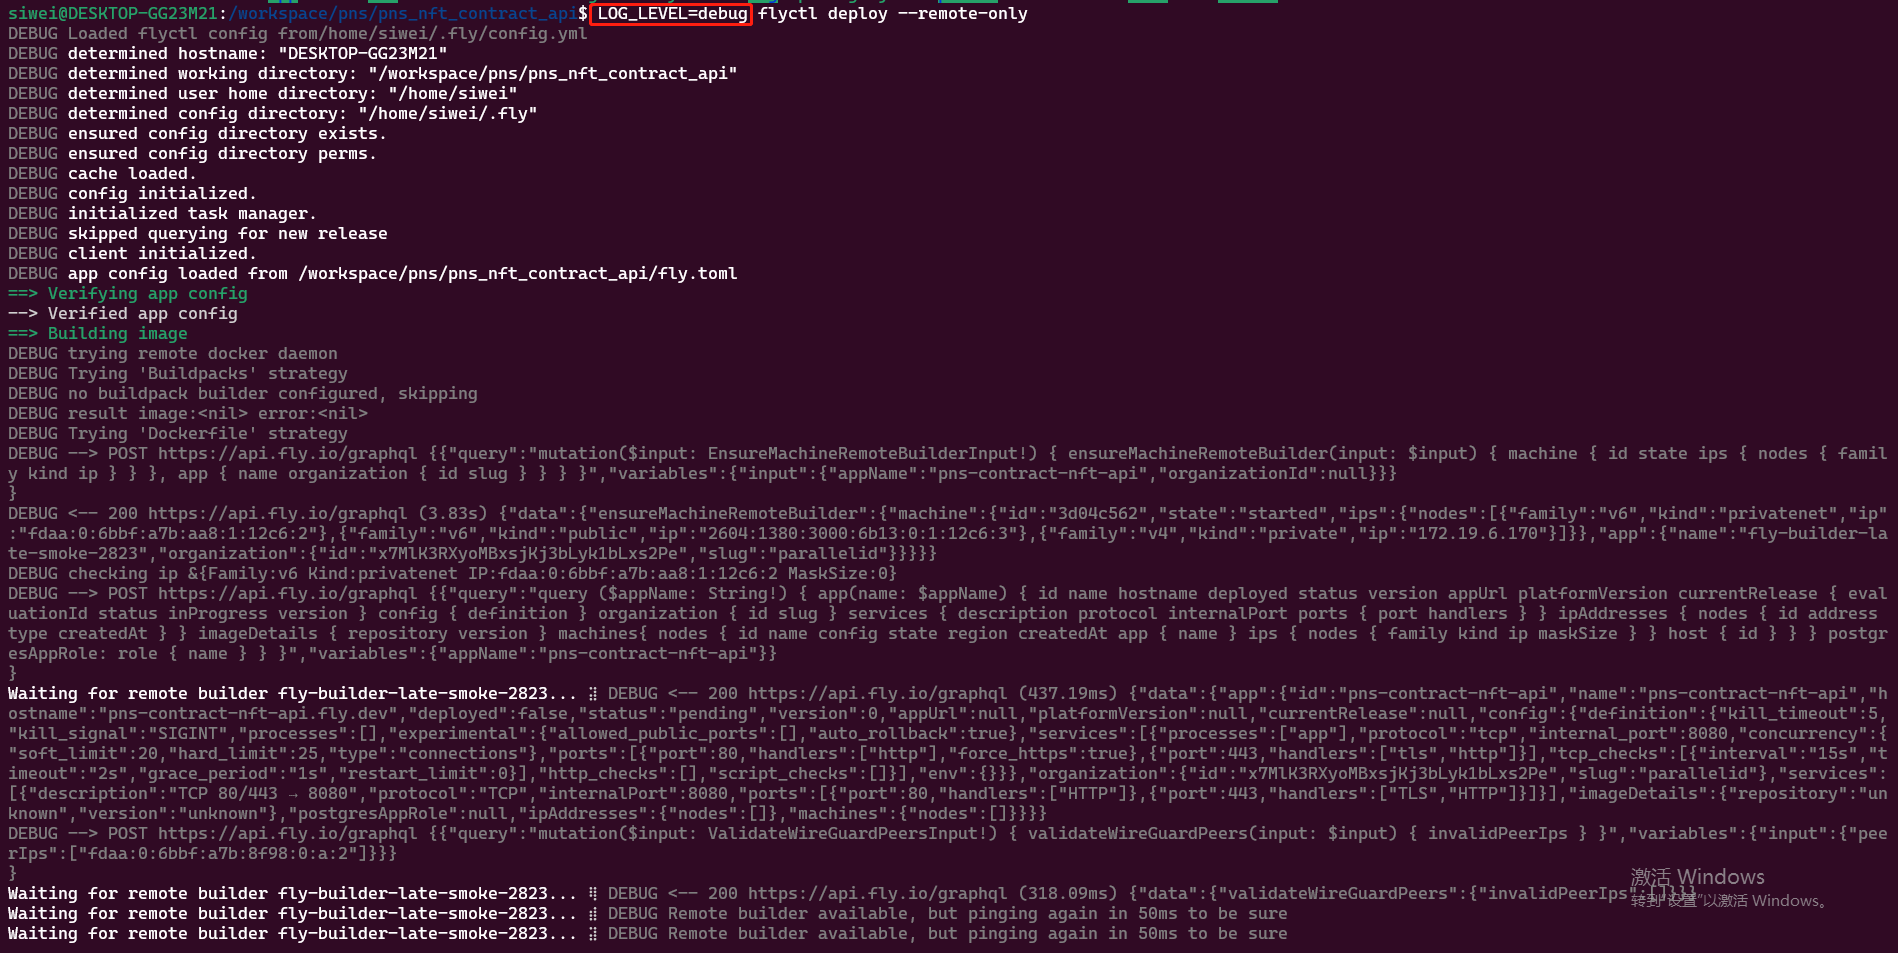
deploy; 使用日志
LOG_LEVEL=debug fly deploy --remote-only 务必 加上这个LOG_LEVEL=debug
务必保证在你的本地是可以运行生产模式的。 rails s -e production
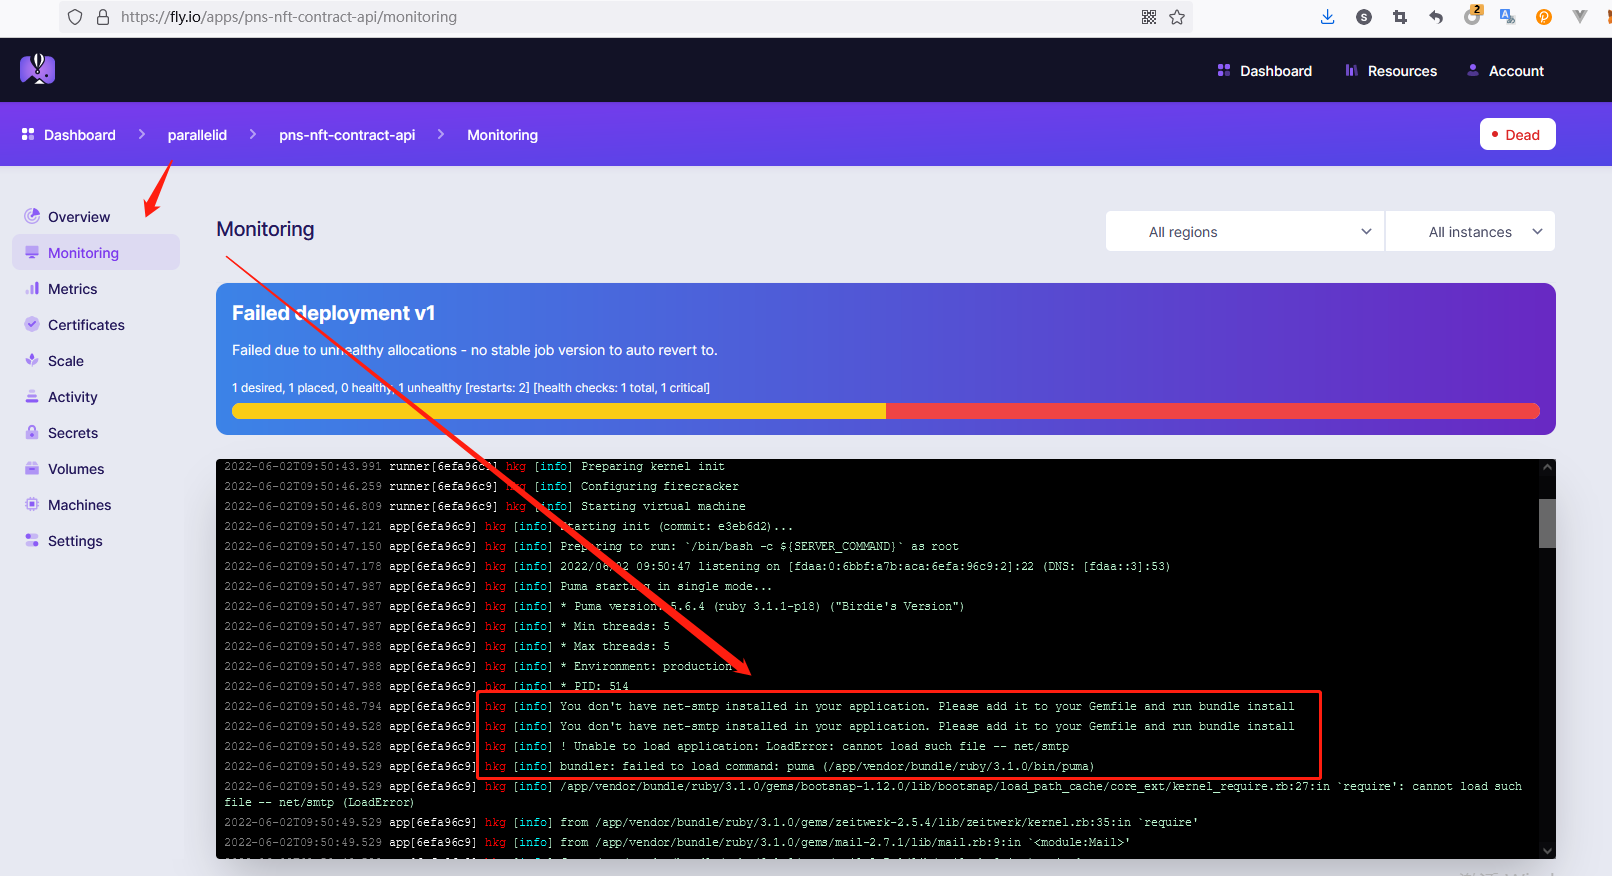
遇到卡住的问题怎么办? fly.io Error error connecting to docker: remote builder app unavailable
往往是由于 builder 所在的region跟当前app的region不是一个造成的。
解决办法: 删掉这个builder,
https://community.fly.io/t/deployment-issue-remote-builder-app-unavailable/5126/7
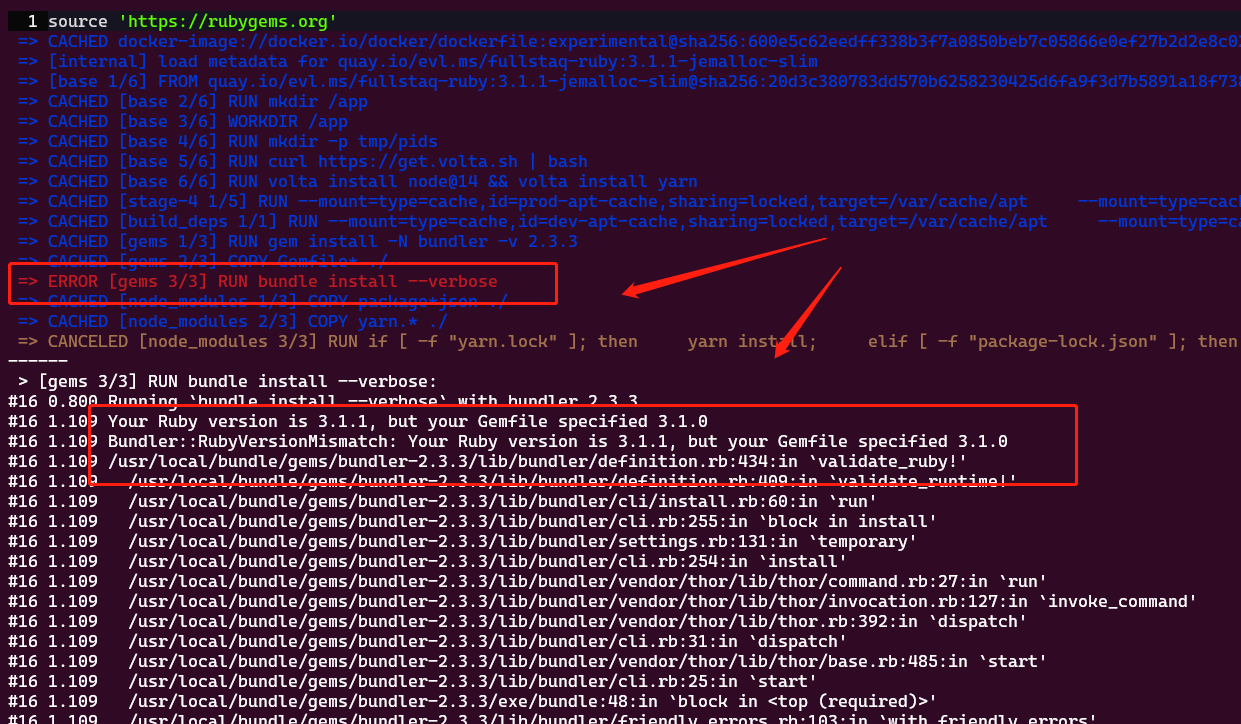
遇到问题怎么办? 看日志,拆分命令
1. 先是看到这个错误,完全没有头绪:
 => ERROR [gems 3/3] RUN bundle install &&  rm -rf vendor/bundle/ruby/*/cache                                                                                                          0.9s
------
 > [gems 3/3] RUN bundle install &&  rm -rf vendor/bundle/ruby/*/cache:
#16 0.926 Your Ruby version is 3.1.1, but your Gemfile specified 3.1.0
------
DEBUG result image:<nil> error:error building: executor failed running [/bin/bash -c bundle install &&  rm -rf vendor/bundle/ruby/*/cache]: exit code: 18
Error error building: executor failed running [/bin/bash -c bundle install &&  rm -rf vendor/bundle/ruby/*/cache]: exit code: 18
然后,我们就把对应的Dockerfile 做个改动, 只运行一个:
-RUN bundle install && rm -rf vendor/bundle/ruby/*/cache
+#RUN bundle install && rm -rf vendor/bundle/ruby/*/cache
+RUN bundle install --verbose (现在使用了这个 --verbose 参数)
然后我们就看到原因了,是ruby版本号不对。
连接 fly.io 上的postgres 数据库
flyctl postgres connect -a <nft-contract-api-db>
后面的是db的名字, 也就是app name, 在后台中可以看到。
连到之后, 就是正常的postgres操作了。
默认: 会产生一个 数据库,名称和app name 是一样的。记得修改 config/database.yml ( 在 dockerfile 中)
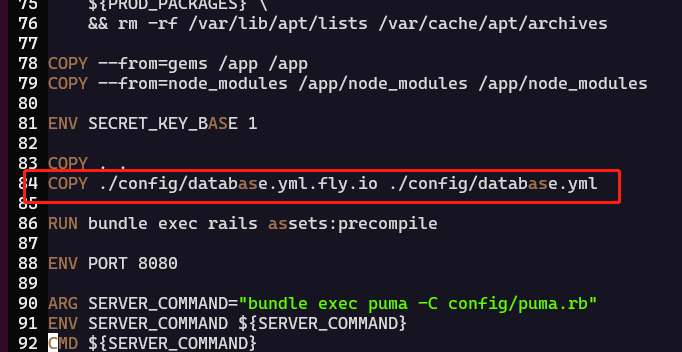
例如增加下面这句
82
83 COPY . .
84 COPY ./config/database.yml.fly.io ./config/database.yml
85
86 RUN bundle exec rails assets:precompile
如何部署Rails 应用? 运行 fly launch 会生成2个文件:Dockerfile, fly.toml
Dockerfile 的内容如下;
可以看出:
1. docker文件中指定了ruby的版本 (2.7.3)
2.
# syntax = docker/dockerfile:experimental
# 这里指定了ruby版本
ARG RUBY_VERSION=2.7.3
ARG VARIANT=jemalloc-slim
FROM quay.io/evl.ms/fullstaq-ruby:${RUBY_VERSION}-${VARIANT} as base

# 这里指定了node版本
ARG NODE_VERSION=16

# 指定了bundler版本
ARG BUNDLER_VERSION=2.3.9

# 指定了rails环境
ARG RAILS_ENV=production
ENV RAILS_ENV=${RAILS_ENV}

# 使用 rails 处理静态文件? 存疑,因为后面指定了public assets目录
ENV RAILS_SERVE_STATIC_FILES true

# 把日志放在 stdout中
ENV RAILS_LOG_TO_STDOUT true

# 这里很重要, Gemfile的bundle 默认是不包括development, test的,所以我们为了稳妥起见,还是要包含它们。
#ARG BUNDLE_WITHOUT=development:test
ARG BUNDLE_PATH=vendor/bundle
ENV BUNDLE_PATH ${BUNDLE_PATH}
#ENV BUNDLE_WITHOUT ${BUNDLE_WITHOUT}

# 这里很重要,内容部署到了 /app 路径下。 所以静态文件的路径是 /app/public
RUN mkdir /app
WORKDIR /app
RUN mkdir -p tmp/pids

SHELL ["/bin/bash", "-c"]

RUN curl https://get.volta.sh | bash

ENV BASH_ENV ~/.bashrc
ENV VOLTA_HOME /root/.volta
ENV PATH $VOLTA_HOME/bin:/usr/local/bin:$PATH

# 使用 volta 安装node相关的内容
RUN volta install node@${NODE_VERSION} && volta install yarn

FROM base as build_deps

ARG DEV_PACKAGES="git build-essential libpq-dev wget vim curl gzip xz-utils libsqlite3-dev"
ENV DEV_PACKAGES ${DEV_PACKAGES}

RUN --mount=type=cache,id=dev-apt-cache,sharing=locked,target=/var/cache/apt \
    --mount=type=cache,id=dev-apt-lib,sharing=locked,target=/var/lib/apt \
    apt-get update -qq && \
    apt-get install --no-install-recommends -y ${DEV_PACKAGES} \
    && rm -rf /var/lib/apt/lists /var/cache/apt/archives

FROM build_deps as gems

RUN gem install -N bundler -v ${BUNDLER_VERSION}

COPY Gemfile* ./
RUN bundle install &&  rm -rf vendor/bundle/ruby/*/cache

FROM build_deps as node_modules

COPY package*json ./
COPY yarn.* ./

RUN if [ -f "yarn.lock" ]; then \
    yarn install; \
    elif [ -f "package-lock.json" ]; then \
    npm install; \
    else \
    mkdir node_modules; \
    fi

FROM base

ARG PROD_PACKAGES="postgresql-client file vim curl gzip libsqlite3-0"
ENV PROD_PACKAGES=${PROD_PACKAGES}

RUN --mount=type=cache,id=prod-apt-cache,sharing=locked,target=/var/cache/apt \
    --mount=type=cache,id=prod-apt-lib,sharing=locked,target=/var/lib/apt \
    apt-get update -qq && \
    apt-get install --no-install-recommends -y \
    ${PROD_PACKAGES} \
    && rm -rf /var/lib/apt/lists /var/cache/apt/archives

COPY --from=gems /app /app
COPY --from=node_modules /app/node_modules /app/node_modules

ENV SECRET_KEY_BASE 1

COPY . .

RUN bundle install
RUN bundle exec rails assets:precompile RAILS_ENV=production

# rails server的端口是 8080
ENV PORT 8080

# 这里需要我们弄一个 config/puma.rb 文件,fly.io不会自动为我们生成
ARG SERVER_COMMAND="bundle exec puma -C config/puma.rb"
ENV SERVER_COMMAND ${SERVER_COMMAND}
CMD ${SERVER_COMMAND}
为Rails项目增加 fly.toml ,内容如下:
# fly.toml file generated for pns-nft-contract-api on 2022-06-02T15:37:11+08:00

app = "pns-nft-contract-api"

kill_signal = "SIGINT"
kill_timeout = 5
processes = []

[build]

  [build.args]
    BUNDLER_VERSION = "2.3.3"
    NODE_VERSION = "14"
    RUBY_VERSION = "3.1.1"   #这里指定了ruby版本,跟Docker中指定的有差异,先放着

[deploy]
  release_command = "bundle exec rails db:migrate"

[env]
  PORT = "8080"   #8080端口, 对应Dockerfile
  SERVER_COMMAND = "bundle exec puma -C config/puma.rb"  # 对应dockerfile的命令

[experimental]
  allowed_public_ports = []
  auto_rollback = true

[[services]]
  http_checks = []
  internal_port = 8080    # 内部指向 8080 ,进程名 app
  processes = ["app"]
  protocol = "tcp"
  script_checks = []

  [services.concurrency]
    hard_limit = 25
    soft_limit = 20
    type = "connections"

  [[services.ports]]     # 对外暴露的端口, 80
    force_https = true
    handlers = ["http"]
    port = 80

  [[services.ports]]     # 对外暴露 443 端口
    handlers = ["tls", "http"]
    port = 443

  [[services.tcp_checks]]
    grace_period = "1s"
    interval = "15s"
    restart_limit = 0
    timeout = "2s"

[[statics]]
  guest_path = "/app/public"   # 静态文件的路径,很重要
  url_prefix = "/"
第三,保证 config/puma.rb ( config/storage.yml ) 等配置文件都在。
config/puma.rb 的内容如下:
max_threads_count = ENV.fetch("RAILS_MAX_THREADS") { 5 }
min_threads_count = ENV.fetch("RAILS_MIN_THREADS") { max_threads_count }
threads min_threads_count, max_threads_count

worker_timeout 3600 if ENV.fetch("RAILS_ENV", "development") == "development"

port ENV.fetch("PORT") { 3000 }
environment ENV.fetch("RAILS_ENV") { "development" }
pidfile ENV.fetch("PIDFILE") { "tmp/pids/server.pid" }
plugin :tmp_restart
Rails在命令行重启
1. 使用 fly ssh console 登录到远程服务器(登录后无法top, ps , apt install )
2. 可以使用bundle exec rails restart 来重启
3. 可以使用 bundle exec rails console 来进行各种控制
如何SSH登录并使用?
1. fly ssh console
2. 更新: apt-get update
3. 安装 top, ps : apt-get install procps
4. 随便操弄
如何实现自定义域名的SSH访问?
1. 要求部署是成功的
2. 使用fly.io 自带的域名进行访问, 例如 airdrop-rails-test.fly.dev
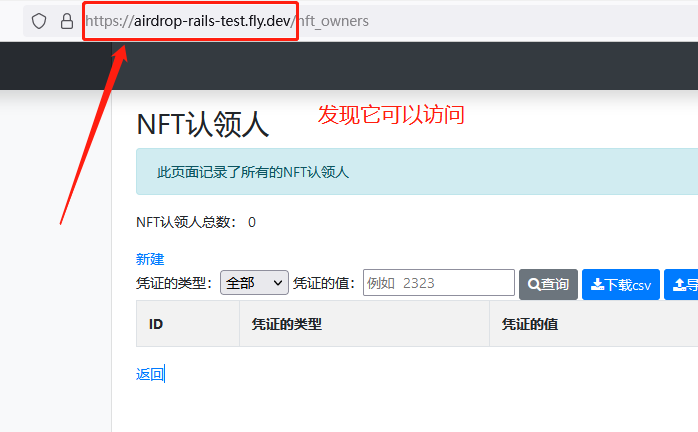
然后确认一下目前的域名无法访问

3. 发现可以访问后,配置你的域名,指向到对应的IP
4. 在fly.io控制台, 配置 ssl 证书
4.1 对目标域名进行创建
4.2 在你的domain 控制台,根据情况对它进行验证
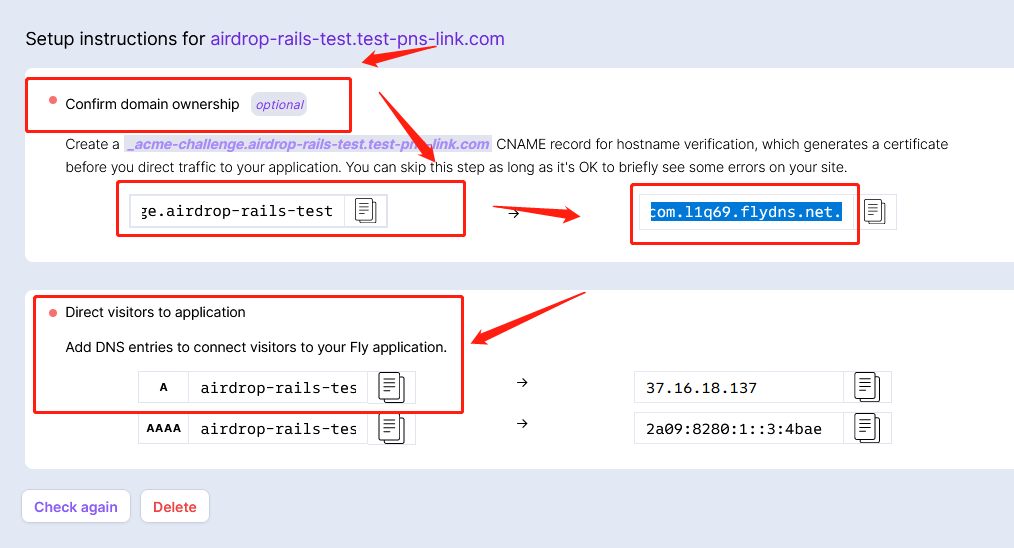
5. 在你的域名控制台, 配置CNAME
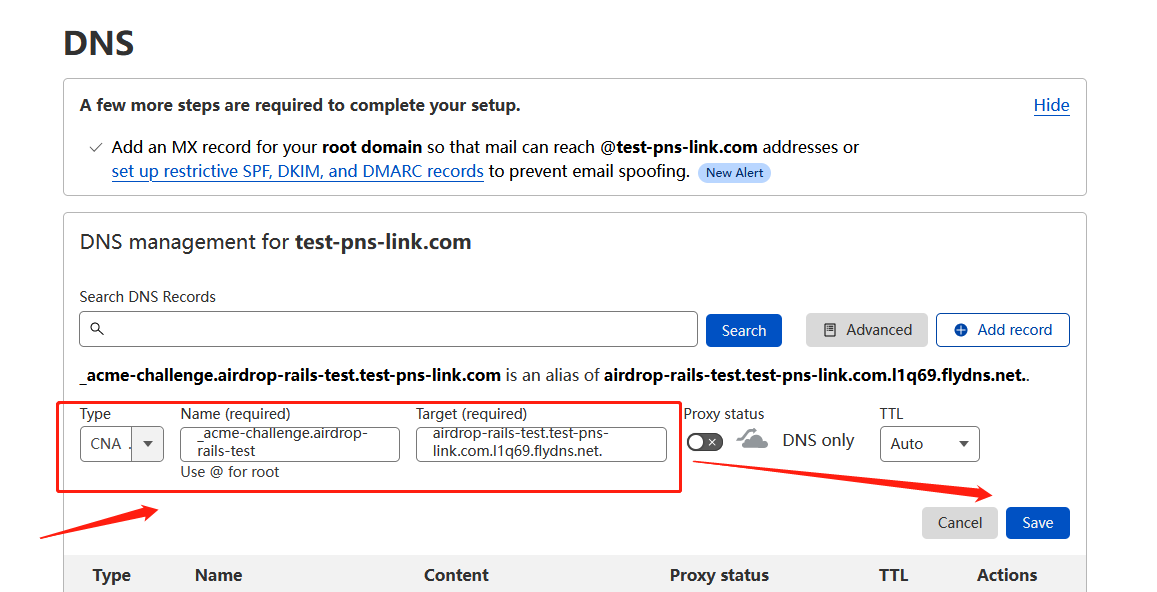
6. 记得检查一下
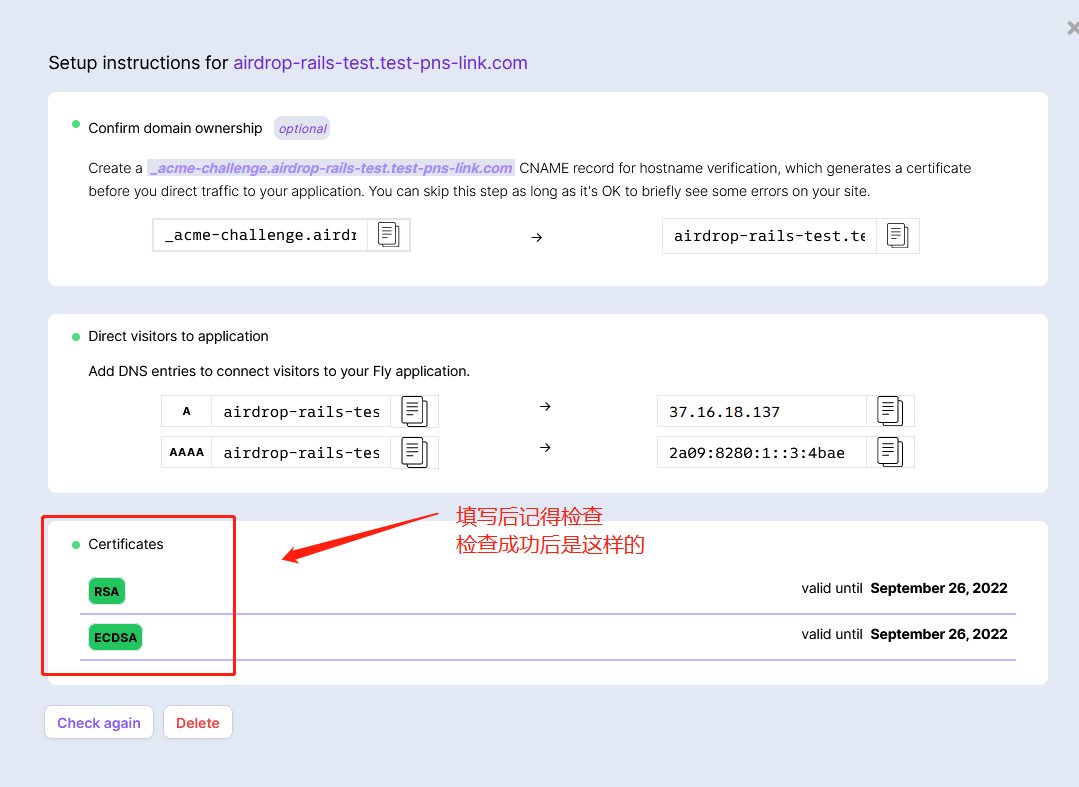
7. 然后就可以访问了.
如何使用 volumes?
volumes用于持久化保存文件,例如 上传的头像(我觉得也可以保存日志)
1.
# fly volumes create files
Update available 0.0.362 -> v0.0.372.
Run "flyctl version update" to upgrade.
? Select region: Hong Kong, Hong Kong (hkg)
        ID: vol_70zy6r7wxwyvdjng
      Name: files
       App: space-web3dali-com
    Region: hkg
      Zone: 553e
   Size GB: 3
 Encrypted: true
Created at: 14 Aug 22 00:21 UTC
2. 修改fly.toml, 配置好该volume
[build] ....

[mounts]
  destination = "/app/public/uploads"   # 这个就是对应的路径,很类似于 ln -s ....
  source = "files"  # 这个files 就是上面创建好的volume

[deploy]  .....
如何部署静态网页? https://fly.io/docs/getting-started/static/
1. 把项目在本地成功
yarn install
yarn dev
yarn build
就会得到静态文件夹, 有的是dist, 有的是 public, 有的是 build , 叫法不一样。
2. 创建Dockerfile (因为fly.io 需要用gostatic 来运行, 注意下面的COPY后面的参数,必须是正确的 (public, dist... ) )
FROM pierrezemb/gostatic
COPY ./public/ /srv/http/
3. flyctl launch
做一系列选择,填写app 的名称(这个最重要) 会生成一个 fly.toml文件。
(一定要先有Dockerfile , 再 生成 fly.toml , 否则生成的fly.toml 中包含了build 模块,会导致占用大量的时间和空间,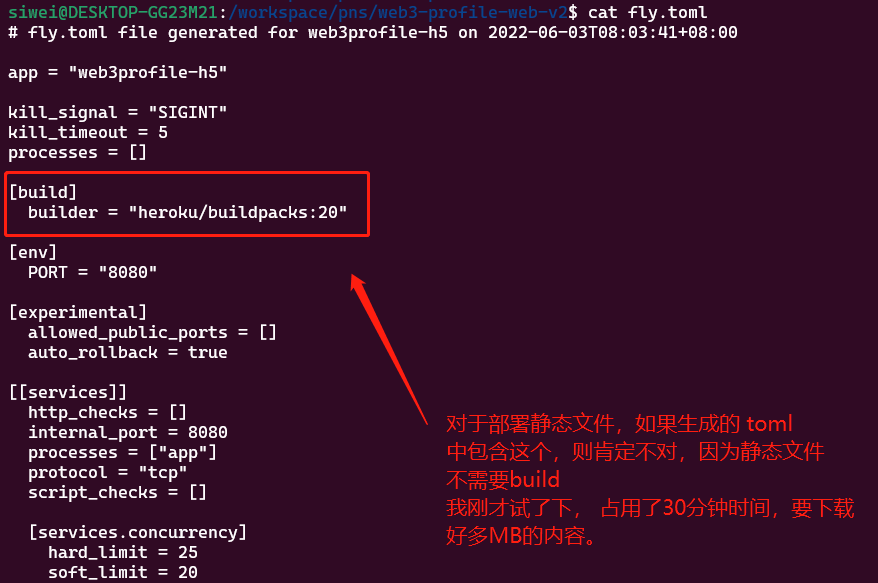
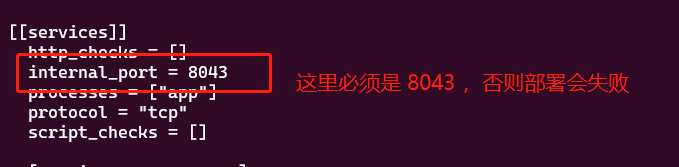
另外,需要修改 fly.toml中的 端口为8043, 因为gostatic 会用这个端口,而不是8080 .
4. flyctl deploy
对于静态文件,部署需要一些时间(还是会生成一个docker的。所以需要等一会儿)
部署静态文件的完整日志 (大概5分钟吧。主要是传140MB的内容到docker )
Run "flyctl version update" to upgrade.
==> Verifying app config
--> Verified app config
==> Building image
==> Creating build context
--> Creating build context done
==> Building image with Docker
--> docker host: 20.10.14 linux x86_64
[+] Building 196.5s (0/1)
[+] Building 3.6s (6/6) FINISHED
 => [internal] load remote build context                                                                                                                                               0.0s
 => copy /context /                                                                                                                                                                    2.6s
 => [internal] load metadata for docker.io/pierrezemb/gostatic:latest                                                                                                                  0.0s
 => [1/2] FROM docker.io/pierrezemb/gostatic                                                                                                                                           0.0s
 => CACHED [2/2] COPY ./dist/ /srv/http/                                                                                                                                               0.0s
 => exporting to image                                                                                                                                                                 0.1s
 => => exporting layers                                                                                                                                                                0.0s
 => => writing image sha256:abfc075dad86d2c22dca16fa3970a8ac63b19160d6e07281252b2c850f6a060a                                                                                           0.0s
 => => naming to registry.fly.io/web3profile-h5:deployment-1654218710                                                                                                                  0.0s
--> Building image done
==> Pushing image to fly
The push refers to repository [registry.fly.io/web3profile-h5]
f182eeeabdec: Layer already exists
f347b3d1982a: Layer already exists
deployment-1654218710: digest: sha256:6a3aeee76e2cf842ebc892ef33a7fcff58c500ef49c021a81d876c7a514d5aaf size: 739
--> Pushing image done
image: registry.fly.io/web3profile-h5:deployment-1654218710
image size: 5.5 MB
==> Creating release
--> release v3 created

--> You can detach the terminal anytime without stopping the deployment
==> Monitoring deployment

 1 desired, 1 placed, 1 healthy, 0 unhealthy
--> v3 deployed successfully
如何查看log?
flyctl logs
如何 登录SSH?
flyctl ssh console 即可(前提是 这个APP需要成功运行起来)进入后跟linux的操作系统一样的。
WORKDIR /app 这个是dockerfile中定义的内容。
所以我们 ssh 之后,来这里就可以看到了
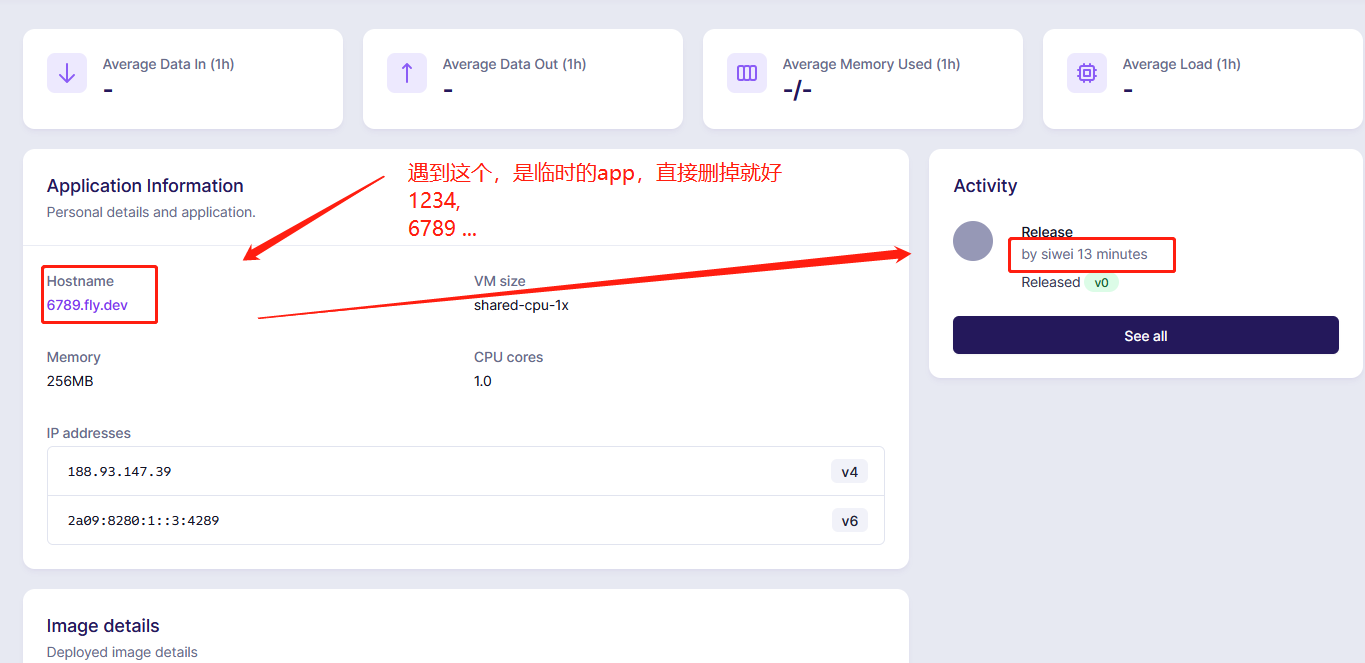
1234? 6789? 这个是啥APP?
是临时性的app, 直接删掉就好
附录:一个完整的deploy 日志
==> Verifying app config
--> Verified app config
==> Building image
Remote builder fly-builder-late-smoke-2823 ready
==> Creating build context
--> Creating build context done
==> Building image with Docker
--> docker host: 20.10.12 linux x86_64
[+] Building 220.7s (0/1)
[+] Building 68.1s (25/25) FINISHED
 => [internal] load remote build context                                                                                                                                               0.0s
 => copy /context /                                                                                                                                                                    3.8s
 => resolve image config for docker.io/docker/dockerfile:experimental                                                                                                                  2.3s
 => CACHED docker-image://docker.io/docker/dockerfile:experimental@sha256:600e5c62eedff338b3f7a0850beb7c05866e0ef27b2d2e8c02aa468e78496ff5                                             0.0s
 => [internal] load metadata for quay.io/evl.ms/fullstaq-ruby:3.1.1-jemalloc-slim                                                                                                      0.8s
 => [base 1/6] FROM quay.io/evl.ms/fullstaq-ruby:3.1.1-jemalloc-slim@sha256:20d3c380783dd570b6258230425d6fa9f3d7b5891a18f738e3a1bf432ba71c9d                                           0.0s
 => CACHED [base 2/6] RUN mkdir /app                                                                                                                                                   0.0s
 => CACHED [base 3/6] WORKDIR /app                                                                                                                                                     0.0s
 => CACHED [base 4/6] RUN mkdir -p tmp/pids                                                                                                                                            0.0s
 => CACHED [base 5/6] RUN curl https://get.volta.sh | bash                                                                                                                             0.0s
 => CACHED [base 6/6] RUN volta install node@14 && volta install yarn                                                                                                                  0.0s
 => CACHED [stage-4 1/6] RUN --mount=type=cache,id=prod-apt-cache,sharing=locked,target=/var/cache/apt     --mount=type=cache,id=prod-apt-lib,sharing=locked,target=/var/lib/apt       0.0s
 => CACHED [build_deps 1/1] RUN --mount=type=cache,id=dev-apt-cache,sharing=locked,target=/var/cache/apt     --mount=type=cache,id=dev-apt-lib,sharing=locked,target=/var/lib/apt      0.0s
 => CACHED [gems 1/3] RUN gem install -N bundler -v 2.3.3                                                                                                                              0.0s
 => CACHED [gems 2/3] COPY Gemfile* ./                                                                                                                                                 0.0s
 => CACHED [gems 3/3] RUN bundle install --verbose                                                                                                                                     0.0s
 => CACHED [stage-4 2/6] COPY --from=gems /app /app                                                                                                                                    0.0s
 => CACHED [node_modules 1/3] COPY package*json ./                                                                                                                                     0.0s
 => CACHED [node_modules 2/3] COPY yarn.* ./                                                                                                                                           0.0s
 => CACHED [node_modules 3/3] RUN if [ -f "yarn.lock" ]; then     yarn install;     elif [ -f "package-lock.json" ]; then     npm install;     else     mkdir node_modules;     fi     0.0s
 => CACHED [stage-4 3/6] COPY --from=node_modules /app/node_modules /app/node_modules                                                                                                  0.0s
 => [stage-4 4/6] COPY . .                                                                                                                                                             5.2s
 => [stage-4 5/6] COPY ./config/database.yml.fly.io ./config/database.yml                                                                                                              0.0s
 => [stage-4 6/6] RUN bundle exec rails assets:precompile                                                                                                                             45.3s
 => exporting to image                                                                                                                                                                 8.3s
 => => exporting layers                                                                                                                                                                8.3s
 => => writing image sha256:4aa3d7d25ac59ece3e9a640a57d230679fd13bc923373200956d95a37adc9177                                                                                           0.0s
 => => naming to registry.fly.io/-nft-contract-api:deployment-1654165275                                                                                                            0.0s
--> Building image done
==> Pushing image to fly
The push refers to repository [registry.fly.io/-nft-contract-api]
9acb33ddeb1b: Pushed
bf3128364d17: Pushed
19102a0d8c6b: Pushed
8063bbc1d749: Layer already exists
a41e0e24b7a9: Layer already exists
94f3ecef538c: Layer already exists
c6d66436c943: Layer already exists
ecef848bb7c5: Layer already exists
b076370e9539: Layer already exists
5f70bf18a086: Layer already exists
3baf9688bf6b: Layer already exists
2bff5884c8b6: Layer already exists
608f3a074261: Layer already exists
deployment-1654165275: digest: sha256:51ae351d93b4540816abca559859406872e2df4a6c64b75af73dc5e58971fe42 size: 3053
--> Pushing image done
image: registry.fly.io/nft-contract-api:deployment-1654165275
image size: 829 MB
==> Creating release
--> release v3 created

--> You can detach the terminal anytime without stopping the deployment
==> Release command detected: bundle exec rails db:migrate

--> This release will not be available until the release command succeeds.
         Starting instance
         Configuring virtual machine
         Pulling container image
         Starting instance
         Configuring virtual machine
         Pulling container image
         Unpacking image
         Unpacking image
         Configuring firecracker
         Preparing kernel init
         Configuring firecracker
         Starting virtual machine
         Starting init (commit: e3eb6d2)...
         Setting up swapspace version 1, size = 512 MiB (536866816 bytes)
         2022/06/02 10:28:20 listening on [fdaa:0:6bbf:a7b:acc:aad2:2e38:2]:22 (DNS: [fdaa::3]:53)
         Starting virtual machine
         Starting init (commit: e3eb6d2)...
         Setting up swapspace version 1, size = 512 MiB (536866816 bytes)
         no label, UUID=a808fe16-c2cd-42e7-ab1f-17c77247fb9e
         2022/06/02 10:28:20 listening on [fdaa:0:6bbf:a7b:acc:aad2:2e38:2]:22 (DNS: [fdaa::3]:53)
         Main child exited normally with code: 0
         Starting clean up.
         Main child exited normally with code: 0
         Starting clean up.
         Starting instance
         Configuring virtual machine
         Pulling container image
         Unpacking image
         Preparing kernel init
         Configuring firecracker
         Starting virtual machine
         Starting init (commit: e3eb6d2)...
         Setting up swapspace version 1, size = 512 MiB (536866816 bytes)
         no label, UUID=a808fe16-c2cd-42e7-ab1f-17c77247fb9e
         Preparing to run: `bundle exec rails db:migrate` as root
         2022/06/02 10:28:20 listening on [fdaa:0:6bbf:a7b:acc:aad2:2e38:2]:22 (DNS: [fdaa::3]:53)
         Main child exited normally with code: 0
         Starting clean up.
==> Monitoring deployment

 1 desired, 1 placed, 1 healthy, 0 unhealthy [health checks: 1 total, 1 passing]
--> v3 deployed successfully
部署Redis
redis是Rails项目必须用到的东东
千万不要参考 官方文档 https://fly.io/docs/reference/redis/ ,这个步骤会生成一个 有问题的 fly.toml ,无法完成部署
要参考这个: https://github.com/fly-apps/redis 后面其他的demo也都是一样的
其实非常简单, 创建一个文件夹,例如叫 my_redis, 然后增加这个 fly.toml 文件;
app = "siwei-redis"

[build]
  image = "flyio/redis:6.2.6"

[mounts]
  destination = "/data"
  source = "redis_server"
然后创建 volume:
flyctl volumes create redis_server --size 1 (创建容量为1G的 名称为 redis_server 的volume)
flyctl volumes list ( 查看 volume列表)
然后为Redis创建 password
fly secrets set REDIS_PASSWORD=siweidaydayup
fly secrets list
flyctl deploy (可以看到大概20秒就部署成功了。如果一直卡在 monitoring ... 那一步的时候,就要登录web console 去看出现的log 了)
fly deploy
==> Verifying app config
--> Verified app config
==> Building image
Searching for image 'flyio/redis:6.2.6' locally...
Searching for image 'flyio/redis:6.2.6' remotely...
image found: img_98dgp8o90zlvxw05
==> Creating release
--> release v1 created

--> You can detach the terminal anytime without stopping the deployment
==> Monitoring deployment

 1 desired, 1 placed, 1 healthy, 0 unhealthy
--> v1 deployed successfully
登录 REDIS SSH:
flyctl ssh console
/ # redis-cli -h siwei-redis.internal
pns-redis.internal:6379> auth (password)daydayup
OK
pns-redis.internal:6379> keys *
(empty array)
注意:以上步骤创建的是IP地址对外不公开的redis. 使用的地址是 siwei-redis.internal
如果要创建对外可以使用IP的话(推荐),可以用这个fly.toml:
app = "pns-redis"

[build]
  image = "flyio/redis:6.2.6"

[mounts]
  destination = "/data"
  source = "redis_server"

[[services]]
internal_port = 6379
protocol      = "tcp"

  [[services.ports]]
  port     = "6379"

  [[services.tcp_checks]]
  interval = 10000
  timeout  = 2000
使用fly.io 创建mongo (部署Docker)
fly.io 官方中没有支持mongo的demo , 不过我们可以通过创建docker来创建mongo
创建一个文件夹 fly.io.mongo
进来, 创建文件 Dockerfile
FROM mongo:latest
创建volume
flyctl volumes create mongodb --size 1
然后创建 fly.toml , 内容如下;
app = "siwei-mongo"

[build]
  image = "mongo:5.0.6"

[mounts]
  destination = "/data/db"    # 这个很重要,mongodb的docker默认是放在 /data/db目录下的
  source = "mongodb"

[[services]]
  internal_port = 27017
  protocol      = "tcp"

  # 想要允许外网访问的话,就把这个打开。
  [[services.ports]]
  port     = "64000"

  [[services.tcp_checks]]
  interval = 10000
  timeout  = 2000
然后部署:
$ fly deploy
就可以发现,很快跑起来了。
$ fly ssh console
就可以登录了。
如何restore mongodb
fly wireguard create 可以创建一个wire tunnel ,会得到下面的内容:
 fly wireguard create
? Select organization: parallxxxx (paralxxx)
Creating WireGuard peer "interactive-DESKTOP-GG23M21-shensiwei-sina-com-733" in region "hkg" for organization parallelid

!!!! WARNING: Output includes private key. Private keys cannot be recovered !!!!
!!!! after creating the peer; if you lose the key, you'll need to remove    !!!!
!!!! and re-add the peering connection.                                     !!!!
? Filename to store WireGuard configuration in, or 'stdout':  stdout

[Interface]
PrivateKey = t15Gk4qBOoGlwJff+wJzcqjxxx
Address = fdaa:0:6bbf:a7b:9xxxx
DNS = fdaa:0:6bbf::3

[Peer]
PublicKey = e1Yk8div9bnazZD7Mo48x8C+x2xxx
AllowedIPs = fdaa:0:6bbf::/48
Endpoint = hkg2.gatewaxxxxx
PersistentKeepalive = 15
安装 sudo apt install wireguard-tools openresolv ( 参考: https://fly.io/docs/reference/private-networking/)
关于网络问题
你的app叫啥名字,网络就是 xx.internal, 例如上面的redis, app = 'xx', 那么内网ip就是 xx.internal, 可以被直接访问